Saturday, October 4, 2014

SPOOKY HALLOWEEN ALBUM


SPOOKY HALLOWEEN ALBUM

DATE:    Saturday, October 18th
TIME:    11:00a.m. - 4pm (Pack a lunch)
PLACE:  Scrapbook Island in San Jose
FEE:       $85.00

                AND
DATE:    Sunday, October 26th
TIME:   10:30 a.m. – 3:30 p.m. (pack a lunch)
PLACE:  Katie’s World, Stockton
FEE:      $85.00

Do you have a skeleton in your closet? When you create this Haunted House and Halloween Album, the answer will be, YES! We’ll use Carta Bella’sSpooky paper line to alter a box to create a haunted house, complete with a skeleton album that drops out of your closet!  Watch the witch brewing up deadly potions through the house’s mica window. You’ll put those potions into little glass bottles and dangle them in your closet and attach them to the mini album you’ll create using the bind-it-all. There are over 10 page surfaces plus pockets and pull outs for pictures and hidden journaling in this haunted house and album!

In addition to your class kit, please bring:
½” scor-tape
Liquid adhesive
foam brush
crop a dile
paper piercer
Orange Peel Stickles
Black Soot Distress Ink
Foam blending tool

If you already own a Bind-it-All, please bring it to class.

Thursday, August 28, 2014

Love Paris Album at The Piece by Piece


WHERE:   The Piece by Piece                                                                                              37485 Niles Blvd., Fremont (510) 894-2488

WHEN:   Sunday, November 16th

TIME:      10:30 a.m. to 4:30 p.m. (bring a lunch!)

FEE:         $65.00
 
Have you been to Paris? Plan to go someday?  Or, maybe you just love all things Paris, like I do.   And, if you love antique photo albums too, then you won’t want to miss this class! 

You’ll create a beautifully covered album with an Eiffel Tower collage under glass and encased in rhinestones. I’ll show you how I’ve altered a 5x7 Idea-Ology book to create a vintage inspired binding with lace pockets, a peek-a-boo window, and a fun fabric board too!  We’ll use Paris themed paper (Glamour & Grunge) by Melissa Frances.  


STUDENT SUPPLY LIST:
Ranger Black Soot Distress paint
Dry Adhesive for attaching paper to chipboard – I like 3/8” wide Scor-tape
Wet Adhesive-clear drying (The Ultimate Glue, Aleene’s Super Thick Tacky Glue or E6000 )
Craft knife (I prefer a “box cutter” style knife)
Self-healing mat
Basic kit:  Scissors, paper cutter, bone folder

Wednesday, June 18, 2014

Mad Tea Party Class


WHERE:      Katie's World  (Stockton)
WHEN:        Sunday, August 17th 
                       SOLD OUT!
TIME:           10:00 a.m. to 5:00 p.m. (we’ll take a short break for lunch)
FEE:              $85.00

WHERE:      Scrapbook Island (link is coming next week)
WHEN:        Sunday, September 21st
TIME:           11:00 a.m. to 5:00 p.m. (pack a lunch!)
FEE:              $85.00


Description:
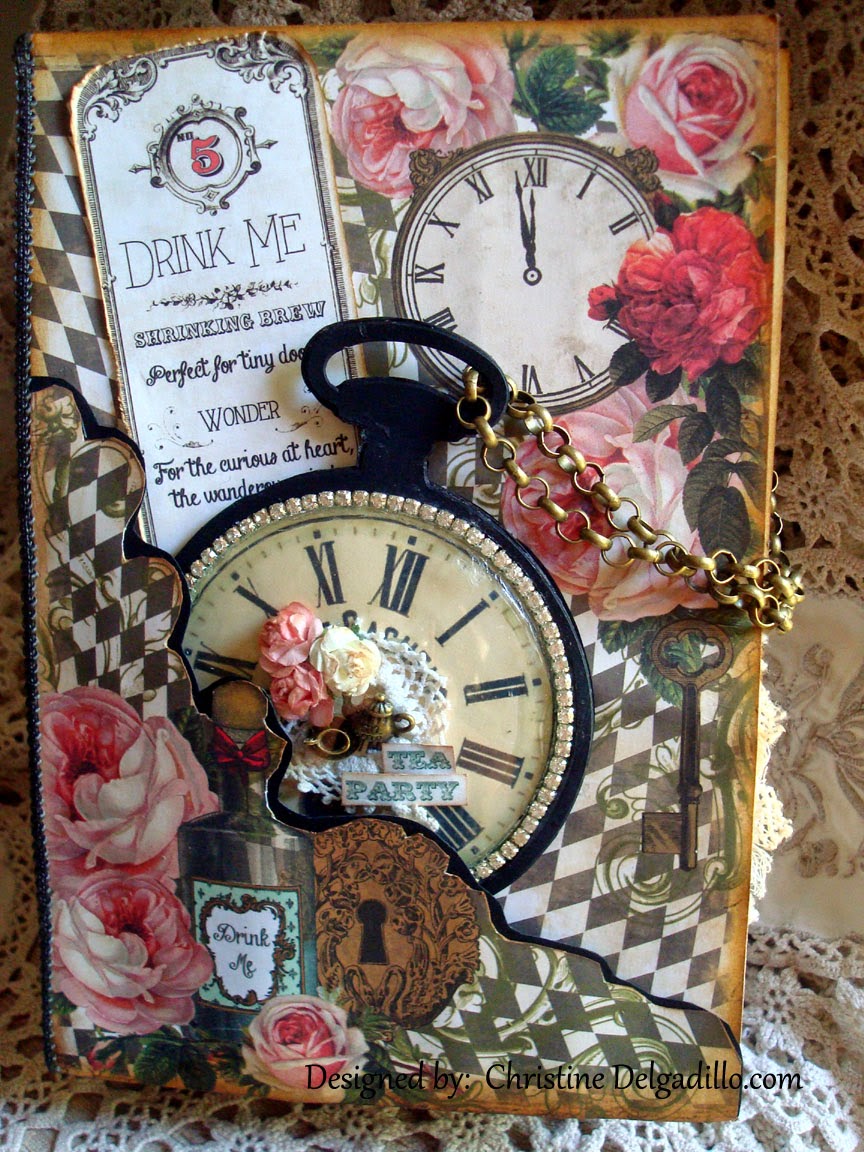
I don’t know why, but I just love clocks, and have a fondness for things with small drawers.  Imagine mixing those two elements together, along with a configuration book, and Marion Smith’s Mad Tea Party paper line (which happens to have a clock of some sort on every page), and you have the perfect combination for a not-so-mini-album!  With 15 page surfaces and pocket pages too, there’s plenty of room to add photos.  I’m in love with the four inch wide, faux, pocket watch we’ll make and tuck in the cover of the album.  And, there’s a little tea party going on under the domed glass encased with rhinestone.  Not only is it cute, but it’s functional too since the thick chain on the pocket watch acts as a closure for the book.  Add a few drawers and a peek-a-boo shadow box on the inside, and you have one “mad” book!       

So, pack a lunch and come spend the day with me creating this fun book! 

Student Supply List: 
Basic Kit:  craft mat, scissors, paper cutter and bone folder
Aleene’s Super Thick Tacky Glue (Pink label)  
Glossy Accents - for use on the pocket watch
Glue Dots (small, but any size will work) – for use on the pocket watch
Crop a Dile

OPTIONAL:   Evergreen Bough Distress Ink:  We will share my ink pad for making one element of the book.  If you own it too (and you should because it’s one of my favorite colors!), bring it to class and you won’t have to wait to use mine.

OPTIONAL:  If you want a distressed look for your book, bring these items:
Foam blending tool
Favorite brown distress ink (I used Brushed Corduroy)
Distressing Tool (I used the Tonic/Tim Holtz paper distresser)
Stardust Stickles – there are pages in the book that are stickled, but you’ll want to do this part at home because of the drying time.


Time Traveler Class


WHERE:   The Piece By Piece (Fremont)
WHEN:      Saturday, July 12th
 TIME:        10:30 to 4:30 p.m.
Fee:             $85.00

                        AND

WHERE:    Scrapbook Island  (San Jose)
WHEN:        Saturday, July 26th
                       and
                       Sunday, August 24th
TIME:         11:00 a.m. to 5:00 p.m. 
FEE:            $85.00


Description:
This shadowbox book has 14 pages, plus flips, flaps and pockets, for you to add photos and memorabilia.  So many details, like dressing up a five inch 3D dress form and creating a tiny photo album from game pieces to hold mini photos or tiny notes.  You’ll make a miniature burlap wall frame with lace banner, and my favorite – a faux, 3D pocket watch complete with little hands of time.  Pull the handle on the magnetic door and you’ll find room for you to add your own little 3d embellishments.
Inside this altered configuration book you’ll find shabby chic style pages with bits of lace, buttons and flower that go great with the Prima Time Traveler paper collection we’ll be using.  The beautiful tan, burgundy and black color combinations along with the script writing, clocks and rose patterns make this album perfect for any occasion.  Come spend the day with me creating this fun and unique book!

STUDENT SUPPLY LIST:
Bone folder
Aleene Super Thick Tacky Glue (pink label) – Christine highly recommends this glue for this project – it is sold at Scrapbook Island
“anywhere” type hole punch:  Christine’s preference is a Big Bite Crop-a-dile (note:  the hand held crop a dile doesn’t punch deep enough), or a  Japanese screw punch, or a paper piercer

OPTIONAL (If you want a distressed look):
Foam blending tool
Brushed Corduroy Distress Ink
paper distresser - Christine used the Tim Holtz/Tonic paper distresser

Belle Necklace Class


WHERE:   Paris Flea Market (Livermore)
When:      Thursday, August 14th and Thursday, September 18th
Time:       6:30 p.m. to 8:30 p.m.
 Cost:        $45.00


I saw a friend wearing a necklace like this, with a bell-like noise, and I fell in love with it!  I had to make one of my own, and now you can too.  In this class, you'll learn how to hand cut, drill and debur a vintage knife and transform it into a beautiful bell necklace, using a fork tine as the bell's clapper.  You can choose to embellish the face of your necklace with rhinestones, or keep it sophisticatedly simple with its gentle bell ring.  You'll go home with a beautiful, ready-to-wear, necklace.   A great gift for yourself, or for someone special!  Each class is limited to six students, so sign up early! 

All supplies are provided for this class.

Monday, March 31, 2014

Love Paris


“Love Paris”
When:   Saturday, April 26, 2014
Time:  11:00 to 5:00 p.m. 
Fee:  $65.00

AND

Where:  Scrapbook Island
Sunday, May 18, 2014 
Time:  11:00 to 5:00 p.m.
Fee:  $65.00

Have you been to Paris? Plan to go someday?  Or, maybe you just love all things Paris, like I do.   And, if you love antique photo albums too, then you won’t want to miss this class! 

You’ll create a beautifully covered album with an Eiffel Tower collage under glass and encased in rhinestones. I’ll show you how I’ve altered a 5x7 Idea-Ology book to create a vintage inspired binding with lace pockets, a peek-a-boo window, and a fun fabric board too!  We’ll use Paris themed paper (Glamour & Grunge) by Melissa Frances.  

This is an ADVANCED class – so have an early lunch before you get here and pack a power snack!

STUDENT SUPPLY LIST:
Ranger Black Soot Distress paint
Dry Adhesive for attaching paper to chipboard – I like 3/8” wide Scor-tape
Wet Adhesive-clear drying (The Ultimate Glue, Aleene’s Super Thick Tacky Glue or E6000 )
Craft knife (I prefer a “box cutter” style knife)
Self-healing mat
Basic kit:  Scissors, paper cutter, bone folder